| The purpose of this document is to give a comprehensive explanation
of how to build and use a catapult, as well as how to best plan the logistics
of moving them into battle.
The information presented here was compiled with painstaking effort by the author, and should not be re-posted in whole or in part elsewhere without the author's permission. DAoC Catapults |
Front View of a Catapult |
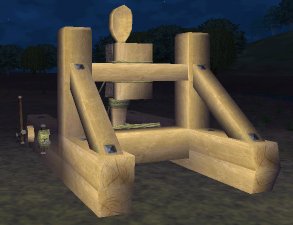
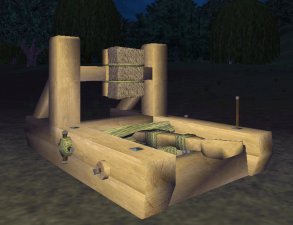
Catapult in Resting Position |
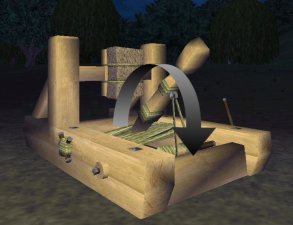
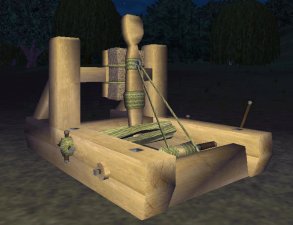
Catapult Arming for Fire (note the position of the arm) |
Catapult Armed for Firing (note the position of the arm) |
Component Formulas
|
|
Component |
|
|
|
|
|
Ammo Bucket |
|
|
|
|
|
Counterweight |
|
|
|
|
|
Pivot |
|
|
|
|
|
Ferrite Winding Crank |
|
|
|
|
|
Tanned Arm Cushion |
|
|
|
Production Costs
| Class I: Onager | ||
|
|
|
|
| 600 Elm Wooden Boards (Vendor) |
|
|
| 1 Ammo Bucket |
|
|
| 1 Counterweight |
|
|
| 1 Pivot |
|
|
| 1 Ferrite Winding Crank |
|
|
| 1 Tanned Arm Cushion |
|
|
|
Total Cost:
|
|
|
| Class II: Catapult | ||
|
|
|
|
| 600 Oaken Wooden Boards (Vendor) |
|
|
| 1 Ammo Bucket |
|
|
| 1 Counterweight |
|
|
| 1 Pivot |
|
|
| 1 Ferrite Winding Crank |
|
|
| 1 Tanned Arm Cushion |
|
|
|
Total Cost:
|
|
|
| Class III: Trebuchet | ||
|
|
|
|
| 600 Ironwood Wooden Boards (Vendor) |
|
|
| 1 Ammo Bucket |
|
|
| 1 Counterweight |
|
|
| 1 Pivot |
|
|
| 1 Ferrite Winding Crank |
|
|
| 1 Tanned Arm Cushion |
|
|
|
Total Cost:
|
|
|
| Catapult Stone (Siege Vendor) |
|
|
|
Albion - Caer Benowyc, in Hadrian's Wall Hibernia - Dun Crauchon, in Emain Macha Midgard - Bledmeer Faste, in Odin's Gate -Wood can be purchased in Tir Na Nog, Innis Cathaig, and at any Merchant
Keep.
Weight Considerations |
Catapult Component Weights
|
|
|
|
| Ammo Bucket |
|
|
| Counterweight |
|
|
| Pivot |
|
|
| Ferrite Winding Crank |
|
|
| Tanned Armed Cushion |
|
|
| Wooden Boards (600) |
|
|
|
Total Ballista Weight:
|
|
|
| Ammunition | ||
| Catapult Stone x20 |
|
|
|
Total Package Total:
|
|
| Based on these figures, one catapult weighs 387 lbs, regardless of
the wood used, and an additional 100 lbs for the ammunition. Here are some
guidelines to use so that your catapult arrives at the siege site with
all of its components.
1) Use as few a number of people as possible to transport components. 2) When allocating weight among individuals, never give them more weight they they can carry, unencumbered, while self-buffed. Example: Garek is a L50 warden with 168 strength. Self-buffed (w/ L50
strength buff, +50 strength) his strength is 218. Check your encumberance,
self-buffed, to know how much you can carry. Keep in mind your armor and
weapons count against your encumberance too, so be sure to look at your
encumberance and not only your strength. Also remember that Realm abilities
like Lifter can greater enhance your carrying capacity (+20% encumberance
per level of skill). With 211 str the max encumberance is 210, but Garek
has Lifter I, so his max encumberance is 261. This character carries approximately
50 pounds of equipment (tools, weapons, armor, arrows, etc.) so he can
carry 211 lbs of equipment. Although Garek's strength is much higher with
a druid's strength/constitution buff, he does not carry more than 211 lbs
of siege equipment. The reason for this is, if someone is strength buffed
and their buffer disconnects, they will be overloaded, and likely unable
to move. If you come into contact with the enemy while moving to your objective,
and the strength buffer is killed, overloaded party members will become
rooted by their encumberance, and easy pray to enemy troops. Wardens, Bards,
and Druids are ideal choices for carrying siege equipment for their self-buffed
capacity, with Heroes, Blademasters, and Champions being a close second
for their raw strength. Many members of these classes are also often Firbolgs,
which gives them an even greater weight capacity.
|
|
Allocating parts for one catapult across four carriers should look something
like:
|
|
Make sure you have a sewing kit, smithing hammer, and planing tool on you when attempting to build any siege weapon! To physically emplace a catapult, you need to keep in mind the areas you want to bombard. Keep in mind that the ballista is an area effect weapon, so in RvR you will want to avoid hitting NPC spawns. You need to be particularly mindful of the minimum range of the ballista. Because it uses indirect fire, it does not require line of sight, but it uses the physics of a parabolic arc when firing, so your target must be a set range away to be fired on. The minimum range of a ballista is approximately 1500 units, and the maximum range is approximately 3500 units. Using /loc, you can estimate these distances. In defending a keep, you will need to place the catapult in the lord's tower or along the back wall in order to deliver fire on the gates. In the offense catapults can be used to deliver firepower on a defended keep, but you will need an accurate ground target. Do not build the catapult too close to the keep being attacked or it will be useless, and expect to have heavy counterbattery fire delivered on you if you deploy a weapon in a siege - it is very easy to target siege weapons outside the keep, but very hard to attack them inside. The equipment carriers pass the engineer the full list of components
once the engineer is standing in the spot the weapon needs to be built.
The weight of all the components will overload the engineer to the point
that he will be unable to move at all. Be mindful of this if the engineer
is killed before construction is complete! If the engineer needs ressurecting
before he has built the weapon, the resser needs to stand exactly
where the engineer died, so that the engineer will be in the correct spot
for construction. If you ressurect the engineer 50 feet away from where
he died, he will not be able to walk to the correct spot, and all the equipment
on him will need to be offloaded so he can move, creating a waste of critical
time.
|
|
|
|
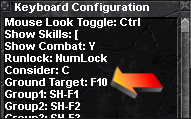
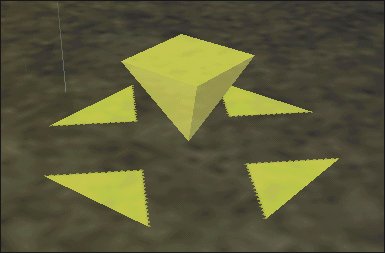
Now use the key indicated, in this case F10, to set your ground target's location. Press and hold F10, and use the arrow keys to move the pulsing targeting cursor across the ground. The cursor always starts directly under your character, then moves depending on the cursor movements you make. Once it is set, it will remain at the position you moved it to until you log off or manually move it again. When you let go of the F10 key, it plants your target at that spot, and prints out the grid coordinates of the cursor's current location.
There are two things which make ground targeting very useful. The first is that the cursor does not move relative to you, so you can run to the front of a keep, place a ground target with precision visually, then return to your catapult and aim at the new target. The second useful feature is the fact that even if you cannot see the cursor's position as a result of visual obstructions (e.g. you are in a keep's courtyard, and the cursor is in front of the keep) you can still use the coordinates to precisely place your ground target. If you know you are going to defend a keep with a catapult, I strongly recommend going outside of the keep at some time before the siege begins, and mapping the coordinates of a few spots. Spots you'd target would be the outer gate, and a few areas where you think enemy casters/healers may congregate. Assassin climb points are also a good target to map, because the AE fire will break their stealth and not allow them to Critical Strike people inside the keep on the walls as easily. Write these grids down on a sheet of paper, so you can use them during the defense, and remember that they won't ever change, so you can keep that note safe and use it the next time you defend the same keep, without re-mapping the locations. It's important to note one thing about locations used by catapults. They use a 6-digit number, based on an absolute grid for the region, whereas the /loc command gives a 5-digit reading in a region. For this reason you need to map your target reference points using the ground target, and not by simply using /loc. I do not know enough about the relation between the two coordinate systems to present a conversion between them. |
|
|
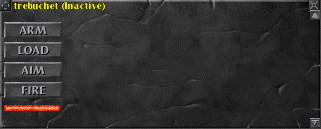 |
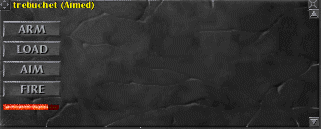
| To bring the catapult into play, start by selecting a ground target as explained above and push the button marked "Aim". The aiming sequence takes 5 seconds to complete. If you move the ground target, the catapult will not track the target, you will need to re-aim it. |
 |
| Now, hit the button marked "Arm" on the control window. The timer bar will begin to fill. It takes 30 seconds to arm a catapult. Note that the timer bar takes less than than 30 seconds to fill, so do not rely on the bar to gauge when the catapult is ready. When the Arm button is pushed, you will see the catapult's arm crank back. |
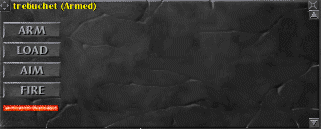 |
| Now that the weapon itself has been prepared using the arming sequence, you need to prepare the ammunition. Take 1 catapult stone from your inventory and drop it directly onto the catapult. You will see the catapult stone appear on the control panel window. Now hit the button labeled "Load". It takes 5 seconds to complete the loading sequence. Although you can load more than one stone at the same time, I recommend not doing so, since stoness tend to get bugged and are lost from inventory but become unfireable. |
 |
| After the 5 second loading period has elapsed, press the "Fire" button
in the window, and the catapult will visually rock back from launching
the stone. You will also receive a melee damage report of the stone's damage,
with the highest damage occuring at the center of the impact area, and
the least damage at the fringe of the blast's effect radius.
At the spot the catapult stone lands, players can momentarily see a bag appear on the ground labeled "catapult stone". If you see one of these bags, you know that you are taking catapult fire and need to react to counter the effectiveness of the enemy's fire.
You can click any button in the sequence continuously until the catapult competes that step; although the timer bar resets, it does not restart the 5 or 30 second requirement. As soon as you have clicked "Fire", immediately click "Arm" again. The trick to efficient catapult operation is to focus on what you are doing. The display can be somewhat misleading, because after you have fired the catapult, the status bar begins filling again on its own, even before "Arm" is selected. However, you cannot fire the catapult again without arming and loading it first, even if the status bar completely refills! If you wait for the bar to refill on it's own after completing a fire, it will prompt you with a dialog of the sort "this weapon must be armed first", and hitting "Arm" will re-start the timer. Don't fall into this mistake - your troops are counting on you to deliver as much damage as possible as quickly as possible! Always re-arm the catapult as soon as you've fired it, since that is the longest sequence, and try and deliver rounds onto the enemy as quickly as possibly, since each round requires a minimum of 40 seconds to deliver. |
|
Macro 1 - Siegecraft menu Trebuchet icon
Now for the construction:
And if the catapult requires repairs,
|
|
It is essential that you watch the catapult's health bar to avoid having
it decay before you are done. Catapults decay two different ways:
Presently siege weapon repairs only check the repairer's Woodworking skill using a pass/ fail skill check. If successful, you will repair the catapult's hit points to full. These repairs cost no resources, and do not require any wood or other material to attempt. If you fail your repair attempt, simply try again. |
|
|
|
|