|
Dark Age of Camelot: New Frontiers® has a new keep system. The design intent behind the new keeps is to give keep warfare new and different options, so that besieging one is not like besieging all the others. Doors are located in different places on different keeps, walls can be destroyed, and you can see the relative strength of a keep by looking it.
Enter From Your Homeland's Border KeepsThere are a total of six border keeps that protect the homelands of each realm. When you approach the border keep from your homeland, you will need to click on the switch in the wall and pass through the great double gates. They are many guards keeping watch, protecting the homeland from invaders. There are also merchants selling various wares, and if you listen closely you may overhear a rumor or two. Pay close attention, for there may be some truth to them.
You will notice the keep's Bind Stone. You may wish to bind here before venturing into the wilds of the Frontier.
Opposite the gates you entered through are another set of gates, heavily fortified with a portcullis. The Frontier lies beyond those gates. Prepare yourself well before you pass through them. A powerful magic has been placed upon these doors, and they do not swing open. You simply walk into the gates and zone through to the other side.
Once on the other side, there are several things to take note of. One is the Hastener. This important member of your realm knows that you need to reach the front lines of the battle swiftly, and he will gladly cast a spell upon you to aid you in your journey. Close by him is a Frontier Portal Stone. You can click on it and the Realm War Map will open for you which may aid you in your travels. See the transportation section for more details.
To reenter the Frontier Keep and zone, you must click on the switch.
The six Frontier Keeps for the realms are (as they have always been):
Albion: Castle Sauvage and Snowdonia Fortress.
Hibernia: Druim Cain and Druim Ligen.
Midgard: Vindsaul Faster and Svasud Faste.
Level 1-10 characters have the option of speaking to an NPC in the various main cities of their respective realms for a free teleport to some border keeps, so that they may begin their RvR adventures in the Battlegrounds (more on those below):
Albion: Camelot - Minstrel Lucaris and Minstrel Olias; Gothwaite Harbor - Minstrel Trinnon
Midgard: Jordheim - Skald Seisill and Skald Rumdall; Aegirhamn - Skald Velder
Hibernia: Tir na Nog - Bard Eltonos and Bard Medrend; Grove of Domnann - Bard Selveren
Once you leave the border keep, your main concern is to defend your realm and drive back the invaders. Open your Realm War Map, and see what keep needs your aid.
Keep Design and Features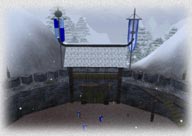 In New Frontiers, the term "Outpost" signifies a keep surrounded by four protective towers. In general, each outpost will have wall sections, towers, a door, and an internal fortified keep. In New Frontiers, the term "Outpost" signifies a keep surrounded by four protective towers. In general, each outpost will have wall sections, towers, a door, and an internal fortified keep.
The towers can be taken by enemies and are also important in maintaining the teleportation status for their keep. Taking keeps in enemy realms and defending your own is crucial in the process of taking and defending Relics. Taking keeps also affects your realm's and the enemy realm's Supply Line.
Each section of a keep has hookpoints that can be utilized by any member of the owning realm. Players are able to attach siege weapons, NPC merchants, and NPC guards to these hookpoints. A player or group of players can go to a tower or section of wall and show which hookpoints are available for use. The player can then choose to build a siege weapon and fire it, buy additional NPCs or upgrade existing NPCs tied to that section.
When you upgrade a keep in New Frontiers, you will visually see the geometry of the keep change. The footprint is not affected, but upgrading will result in taller towers, taller walls, and more hookpoints for siege weapons and NPCs.
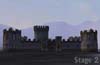
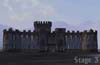
| Keeps have 10 levels of potential upgradability. Below are three examples of possible keep stages. Click on the images to view close-up versions. |
| Example Stage 1 |
Example Stage 2 |
Example Stage 3 |
 |
 |
 |
To enter a keep or tower that is owned by your realm, simply right click on the keep/tower door. If you wish to keep your pet outside of the keep or tower, set your pet on 'Stay' before right clicking on the keep/tower door. Please note that if you do not do this, your pet will automatically travel with you inside the keep.
TowersEach tower is located in a strategic location to the keep it protects: guarding a hilltop within firing range of a keep, overlooking a landing beach, defending a narrow approach, etc. Having these towers gives smaller guilds a chance to control a part of the frontier - towers can be taken over just as the keeps are, with guild banners and guard options.
Attackers as well as defenders will be able to assault and claim these towers. An attacking force can (and should) occupy and upgrade a tower on a hilltop within catapult range of a keep, and bombard it from a defensible position in support of an assault.
Claiming Your Guild's Keep or TowerIn order to claim a keep, you must be in a full group (eight members) and have guild permissions to claim.
In order to claim a tower, you must be in a group with at least four members and have guild permissions to claim.
At the Keep Lord of the keep (or the Tower Captain of the tower) you wish to claim, right click on the Lord. You can also type '/gc claim' while near the Lord/Captain. All members of your group must agree to the claim. At the time of claiming, you must choose the Keep Type. This determines what types of guards are on patrols and what types of guards will spawn naturally at the keep. The three types are Melee, Magic, and Stealth. Once the group members have all agreed, the keep is 'claimed' and the Keep Lord and guards will now display your guild's emblem and name.
At this time, you can choose to upgrade the keep or tower's level. Keeps and Towers start out at level 1. They can be upgraded to the highest level of 10. Upgrading a keep will change the geometry of the keep. At higher levels, you will see higher wall sections and more hookpoints to purchase NPCs and siege weaponry.
Upgrading a tower will change the height of the tower; at higher levels you will gain access to more hookpoints to purchase NPCs.
To upgrade a guild owned keep or tower, you must have guild permissions to upgrade. At the Keep Lord of your claimed keep (or the Tower Captain of the tower), right click on the Lord. The keep's upgrade window will appear. You can also type '/gc upgrade {level}', where {level} is the level you wish to upgrade the keep or tower to.
Keeps take varying times to upgrade based off of level. For each hour that your guild has a keep or tower claimed, your guild must pay a maintenance fee (in guild bounty points).
For each hour that your guild has a keep or tower claimed, the guild earns a guild realm point award that is based on the keep's difficulty level. Keeps located in the guild's home frontier have the lowest difficulty while keeps located in an enemy realm's non-coastal regions have the highest difficulty. For keeps, the guild realm points rewarded per hour is equal to 1000 times the difficulty level. For towers, the guild realm points rewarded per hour is equal to 100 times the difficulty level.
At certain upgrade levels, the Keep Lords have a chance to drop special keys that can be used to open supply chests located inside the keep. The supply chests may contain contracts, potions, and special ammunition that can be used for siege engines.
To release a claimed keep or tower from your guilds control, you must have guild permissions to release. Right-click on the Lord/Captain and the keep's upgrade window will appear. Click 'Release' to remove your guild's claim to the keep or tower. You can also use the command, '/gc release'.
Upgrading Your Realm's Keep or TowerTo enter a keep or tower that is owned by your realm, simply right click on the keep/tower door. There is a strong magic placed upon the doors that will only allow your realm to enter. If you have a pet and wish to keep your pet outside of the keep or tower, set your pet on 'Stay' before right clicking on the keep/tower door. Please note that if you do not do this, your pet will automatically travel with you inside the building.
To view the current status of the keep, shift-right click on the keep wall. The keep status window will appear. This window displays the keep type, the current level of the keep, the target level of the keep, and what guild has claimed the keep (if any). You can also repair walls and use hookpoints with this window.
If you enough Woodworking skill, you may be able to repair damage to a keep/tower wall. To do this, stand next to the wall you wish to repair, shift-right click the wall, and click the 'Repair' button. To repair a door/gate, target the door and type '/repair'. Note that you must have wood boards in your inventory to do the repair to the wall or door/gate.
As players are killed around a keep, bonus realm points are added to a realm point pool that is awarded on a successful capture or defense of that keep. If you have successfully defended your own keep or successfully assaulted an enemy keep, you may be granted these bonus realm points.
Times, Fees, and NPCs
| Keep & Tower Level |
1 |
2 |
3 |
4 |
5 |
6 |
7 |
8 |
9 |
10 |
| Time to Upgrade Keep |
12 mins |
12 mins |
12 mins |
12 mins |
24 mins |
1 hour |
2 hours |
4 hours |
8 hours |
16 hours |
| Hourly Keep Maintenance Fee |
50 |
50 |
50 |
50 |
100 |
200 |
300 |
400 |
500 |
1000 |
| Time to Upgrade Tower |
12 mins |
12 mins |
12 mins |
12 mins |
12 mins |
12 mins |
12 mins |
12 mins |
12 mins |
12 mins |
| Hourly Tower Maintenance Fee |
5 |
5 |
5 |
5 |
10 |
20 |
30 |
40 |
50 |
100 |
| Hourly Keep Fees for Under Populated Realms |
25 |
25 |
25 |
25 |
50 |
100 |
150 |
200 |
250 |
500 |
| Hourly Tower Fees for Under Populated Realms |
3 |
3 |
3 |
3 |
5 |
10 |
15 |
20 |
25 |
50 |
| Combatant Active Hookpoints Per Piece |
1 |
1 |
1 |
1 |
1 |
2 |
2 |
2 |
2 |
3 |
| Non Combatant Hookpoints Per Piece |
0 |
1 |
1 |
1 |
1 |
1 |
1 |
1 |
1 |
1 |
| Small Siege Hookpoints Per Piece |
0 |
0 |
0 |
1 |
1 |
1 |
1 |
1 |
1 |
1 |
| Large Siege Hookpoints Per Piece |
2 |
2 |
2 |
2 |
2 |
2 |
2 |
2 |
2 |
2 |
| Boiling Oil Hookpoints Per Piece |
3 |
3 |
3 |
3 |
3 |
3 |
3 |
3 |
3 |
3 |
This chart represents the baseline. The number of relics your realm holds can affect how long it takes to update a keep. Your realm may also be designated as "an underdog," which will affects upgrade and upkeep costs. Please see the 1.70 patch notes for further details.
Using Hookpoints In Keeps and TowersTo aid your battles with your enemies, you can purchase guards, siege equipment, and amenities merchants from special hookpoints in certain spots on both towers and keeps. You have the option of purchasing these items by using contracts, gold, personal bounty points, or guild bounty points. Contracts are found in supply chests - which are opened via special keys that are looted from Lords in certain upgraded enemy Keeps.
In order to view the hookpoints for a keep or tower, shift-right click on a wall to open the keep status window. Click the 'Hookpoints' button to view the hookpoints for the section of the keep you are currently standing on.
Right click on a hookpoint to open its "store." Once you purchase an object, the object is placed on the hookpoint, and another cannot be placed there until the object (or guard/merchant) is destroyed.
For each level of the keep, you are allowed a certain number of guards to be active on a hookpoint for each keep piece. However, there will be more hookpoints available than the number you are allowed to have active - this is to allow you some freedom in where you wish to place the guard on the keep piece.
The color code for the hookpoints is as follows:
* Red: Guard Store - Guards such as tanks, casters, archers, healers, and assassins can be purchased and placed on these hookpoints.
* Green: Siege Store - siege engines such as palintones and trebuchets can be purchased and placed on these hookpoints.
* Yellow: Boiling Oil Store - cauldrons of boiling oil can be purchased and placed on these hookpoints.
* Blue: Amenities Store - Merchants such as healers, hasteners, dyemasters, arrow merchants, smiths, poison merchants, and rechargers can be purchased and placed on these hookpoints.
Relic Temples
Relic temples are located behind the relic wall. To pass through your realm's milegate, right click on the gate. You will automatically teleport to the other side. The locked mile gates on each relic wall prevent enemy access, but only if the realm's defenders maintain control of the supply chain leading to the relics.
If the Realm loses its keeps in the supply chain leading to the relic keep (please see the transportation section for more information), then the mile gate doors will unlock. The relic temples will, of course, still have a full complement of guards. Sixteen invaders must be present within the temple, and one person must step on the switch pad at the base, before the relic will descend from its column. This descent will take about five minutes, during which time loyal defenders may mount a last ditch attempt to repel the enemy.
There is a two hour relic reset timer, meaning that a stolen relic must be placed in a shrine before two hours pass. If the relic isn't installed in its new home by that point, it will instantly teleport back to the temple it was taken from.
Anyone carrying a relic must have an honor guard protecting him, for he cannot use speed enhancements, swim underwater, use a portal, or zone into the homeland. (He can run into the Passage of Conflict, which connects the three realms, if he's got enough of an army guarding him.)
Please note that on Mordred, it only takes four people in the temple with one on the switch pad to get the relic to start descending.
Opening the Milegates
There are two milegates set into each of the walls that guard the relics. These gates cannot be destroyed or otherwise fought through, but are opened or closed based on territory control. In order to open the first milegate for each relic, you will need to take a set of three keeps. Opening the second gate requires the same three keeps, and one more besides.
You only need one milegate open to pass through the relic wall to reach the temple. The second milegate is situated closer to the relic temple, however, and may allow for the quickest retreat once the relic is in hand. These are among the many tactical decisions facing a leader before beginning a relic raid.
The system for each realm's relic and milegates work as follows:
Albion Power Relic Wall - The first milegate can be opened by taking Caer Benowyc, Caer Berkstead, and Caer Boldiam. The second milegate on this wall can be opened by taking Caer Renaris after the other three have fallen.
Albion Strength Relic Wall - The first milegate can be opened by taking Caer Benowyc, Caer Erasleigh, and Caer Sursbrooke. The second milegate on this wall is opened by taking Caer Hurbury in addition to the other three.
Midgard Power Relic Wall - First milegate: Bledmeer Faste, Notmoor Faste, and Glenlock Faste. Second milegate: Those three and Arvakr Faste.
Midgard Strength Relic Wall - First milegate: Bledmeer Faste, Blendrake Faste, and Hlidskialf Faste. Second milegate: Those three and Fensalir Faste.
Hibernia Power Relic Wall - First milegate: Dun Crauchon, Dun Crimthain, and Dun nGed. Second milegate: Those three and Dun S caithag.
Hibernia Strength Relic Wall - First milegate: Dun Crauchon, Dun Bolg, and Dun da Behnn. Second milegate: Those three and Dun Ailinne.
Spell and Line of Sight Changes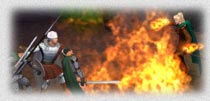 Keeps are designed to minimize line of sight issues. Additionally, keeps have been constructed so that point-blank area affect spells (PBAEs) will not work through keep walls and closed doors. Ground-target area effect spells (GTAEs) still work as they always have. Keeps are designed to minimize line of sight issues. Additionally, keeps have been constructed so that point-blank area affect spells (PBAEs) will not work through keep walls and closed doors. Ground-target area effect spells (GTAEs) still work as they always have.
All area effect spells are not supposed to affect anyone that is under a roof, in much the same manner that the archer skills "volley" and "catapult" were implemented.
The Keeps and Their LayoutsEach realm shares many similar keep structures and layouts. Below are links to images of these layouts:
- Dun Crauchon, Bledmeer Faste, Caer Benowyc
- Dun Crimthainn, Nottmoor Faste, Caer Berkstead
- Dun Bolg, Hlidskialf Faste, Caer Erasleigh
- Dun nGed, Glenlock Faste, Caer Boldiam
- Dun daBehnn, Blendrake Faste, Caer Sursbrooke
- Dun Scathaig, Fensalir Faste, Caer Renaris
- Dun Ailinne, Arvakr Faste, Caer Hurbury
Battleground Keep Wars
The realm is under attack from many directions and many levels. If you don't have the time to join a siege, or if you don't feel strong enough for a particular war, the battlegrounds still need defenders!
In three of the border keeps (Castle Sauvage, Druim Ligen and Svasud Faste), there is a huge stone platform called a `Gating Circle'. Around these rings stand powerful magic casters. These magic casters and `Gating Circles' are there to aid you in your travels, for they know the great urgency with which your realm calls you to battle. If you are from Midgard, speak to Gwulla quickly. In Hibernia you would need to speak with Araisa. In Albion speak with Sall Fadri. Each of these mages will ask you where you want to go. Click battlegrounds in order to be teleported directly to the correct battleground for your level and realm rank.
The battlegrounds are as follows:
- The Proving Grounds (Level 1-4)
- The Lion's Den (Level 5-9)
- The Hill's of Calret (Level 10-14)
- Killaloe (Level 15-19)
- Thindranki (Level 20-24)
- Braemar (Level 25-29)
- Wilton (Level 30-34)
- Molvik (Level 35-39)
- Leirvik (Level 40-44)
You will not be able to earn realm points in the first three battlegrounds (Proving Grounds, The Lions Den, and The Hills of Claret). You also cannot earn bounty points in any of the nine battlegrounds.
You will be able to earn realm points in battlegrounds for levels 15 through 44. There is a limit to the number of realm points you can earn in each battleground. After you reach this limit, killing any other enemy players will not grant any more realm points .
As of version 1.81, battlegrounds have realm point zone in caps to go along with their current level caps. A player that is above the realm point cap for a certain battleground will not be able to visit that battleground and will need to gain more experience to visit the next level appropriate battleground. In the particular case of Leirvik, there is an additional cap of ML3.
Battleground Zone-In Caps:
Realm Rank 1 Level 2 & Level 19- Killaloe
Realm Rank 1 Level 4 & Level 24- Thidranki
Realm Rank 1 Level 9 & Level 29- Braemar
Realm Rank 2 Level 4 & Level 34- Wilton
Realm Rank 2 Level 9 & Level 39- Molvik
Realm Rank 3 Level 9 & Level 44 & ML 3 – Leirvik
- While inside the Battlegrounds, players can earn one Realm Rank higher than the cap to zone in. Furthermore, the amount of Realm points attainable within the Battlegrounds has been adjusted upward. A player will now be able to leave the Final Battleground at Realm Rank 4 instead of Realm Rank 3.
Battleground Realm Rank CAPS:
Realm Rank 1 Level 3 - Killaloe
Realm Rank 1 Level 5 - Thidranki
Realm Rank 2 Level 0 - Braemar
Realm Rank 2 Level 5 - Wilton
Realm Rank 3 Level 0 - Molvik
Realm Rank 4 Level 0 – Leirvik
Points to note about Experience level and Realm Ranks in the Battlegrounds:
- If Realm Rank is capped in the Battleground, a player will not be removed forcibly if they die and release or not get resurrected. They will be ported back to the portal keep of their realm within the Battleground.
- If Realm Rank is capped in the Battleground, and a player willingly ports out of the Battleground, you will not be able to return to the same Battleground.
- If a Player's Experience level exceeds the Battleground cap, they will be removed from the Battleground if they are not resurrected from death.
Example for clarification: A level 24 player that is Realm Rank 1L4 Zones into Thidranki. That player then gets Realm Rank 1L5 while in the Battleground and dies soon after. The player is not resurrected, but releases back to the portal keep within the Battleground. Said player can log out of the game if they desire and come back to the same Battleground later. Upon coming back into the Battleground later on, the same player levels up to level 25. Later that day the level 25 player dies, and upon release of his spirit, he is ported back to the portal keep (Druim Ligen, Svasud Faste, or Castle Sauvage).
Siege in Battlegrounds
Battleground keeps do not have siege, guard, merchant, or boiling oil hookpoints. Players may purchase siege equipment from the Siegemaster at each portal keep in the Battlegrounds or they may craft their own.
The Siegemaster sells special siege equipment to help you in the coming battle. Prices are scaled, based on the level of the Battleground. The tokens from one battleground can not be used in another battleground.
Speak to the Siegemaster by right clicking on him. A store window will open showing you the items he has for sale. Purchase the siege item token you wish to use. You will not need to purchase ammunition, as it is included with the siege weapon. Give the token to the Siegemaster by dragging the token icon unto him.
The Siegemaster then begins to follow you. He will follow you for a maximum of ten minutes. Lead the Siegemaster to the location you wish the siege equipment to be created. Right-click on the Siegemaster and he will ask you several questions. Chose the answer to place the siege item and the Siegemaster will place it. Once the item is placed the Siegemaster will return to the portal keep so that someone else may purchase equipment. Watch out - siegemasters can be killed by the enemy!
There is one siegemaster per realm in the Proving Grounds (Level 1-4), The Lion's Den (Level 5-9), and The Hills of Claret (Level 10-14) Battlegrounds. There are two siegemasters per realm in Killaloe (15-19), Thidranki (20-24) and Braemar (25-29). There are three siegemasters per realm in Wilton (30-34), Molvik (35-39), and Leirvik (40-44).
|  |


 Herald Features
 Game News