
Altwaal's Animist Guideversion 0.2.0, 2002-12-10, by Altwaal of PellinorYou can also view a more printer-friendly version of this page. NOTE: This document is a work in progress. I certainly don't claim to know everything about the Animist, and I'm sure someone will eventually come along and write a much more comprehensive guide than this. Hopefully, they'll do it soon. Until then, I'm here to try to help sort out some of the confusion about a class with one of the steepest learning curves in the game. But enough of the disclaimers, on with the show. Contents
Introduction to the Animist
A tank is a tank, a healer is a healer, and an assassin is an assassin. But an Animist isn't your average pet class. Its closest analogue would probably be the Albion Theurgist, but even that is something of a weak comparison. As you will hear many, many times during your time as an Animist, their goal isn't to be come one with nature, but to become nature itself. All of the Animist's pets and turrets reflect that, as it is the only pet class in the game where the pets don't move. They may be carnivorous mushrooms, but they are still rooted to the ground. You will need to learn to use the ground-targeting system quickly and efficiently, as all of your pet spells depend on it. You should not play an Animist if you are not up for a challenge. If you like the fast-paced action of a tank, the sneaky one-on-one of an assassin, the safe range of an archer, or even the high damage of a pure caster, the Animist may not be for you. The Animist is a tricky class to play, and will definitely require you to think before you act. It will be very frustrating at times until you get the hang of it. You might enjoy playing an Animist if you play for the challenge, or like playing support classes with a wide range of skills. The Animist doesn't have too many tricks up their sleeve, but the tricks they do have can be used in a variety of different ways. I like to think of the Animist as a samurai's katana blade. It's not a broadsword that can cleave someone in half, nor is it a slim poisoned dagger that can slip between someone's ribs. But, when used by someone who knows how to wield it, it's one of the most lethal instruments ever made. If you have the patience and can take the time to learn to get the most out of your Animist, you'll love it. Otherwise, you might want to roll a Valewalker instead. Turrets And Pets: OverviewAnimists have two different types of summoned pets, both of which are summoned by ground-targeting a point and casting your summon spell at that point. The first type of pet is called a turret. This is because not only do they look like little pill boxes, but they are fire-and-forget. That is, you summon them and then lose control over them. They will target anything in their radius and cast their spell on it. This is a very crucial point, and it will get you killed a few times before you get used to it. You can unsummon a turret or pet by targeting it and using a your pet release button. (You can add this button to your quickbar by shift-clicking the Attack button on the pet window.) There does not seem to be any limit to the number of turrets you can cast, except for the amount of mana you have. Get a Mentalist or Bard friend to provide you with a constant stream of crack, and you'll have a huge supply of turrets around you. A turret lasts for 2 minutes and then decomposes. This is another quirk that will get you killed a few times. Your turrets will fight and draw aggro up until the last second before they die off. If a turret draws aggro then dies a few seconds later, the aggro transfers to you and you are left to finish killing off the mob it pulled. The second type of summoned pet is what I'm talking about when I say pet for the rest of this guide. It is closer to the rest of the pets in this game, in that you can control what it targets, and whether it is Aggressive, Defensive, or Passive. But, unlike the rest of the pets, it cannot follow you around. Just like the turrets, your pets cannot move. Spec Lines: OverviewI don't plan on going into great detail and scientific analysis of how to create your Animist in the first place. Everyone has their own opinions on whether you should trade CON for INT or DEX, so I'll leave it up to you. But as for the gradual growth and spec of your character, that I can try to help with. The Animist has three spec lines, just like most Hib casters. The Arborial, Verdant, and Creeping paths. The Creeping spec line is currently also called Undergrowth Mastery. Each spec line has its own pet style, but I'll go into more details on that in the next section.
How Your Spells Work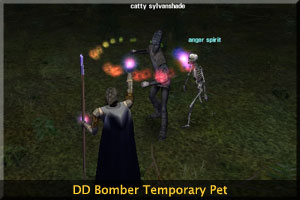
The spells are where most people give up on their Animists. They have their good points and bad points, but mostly they are just confusing to start off. The first and most important thing you'll need to grasp is most of your spells, with the exception of your lifetap, don't work like normal nukes. Most of your spells are called bomber spells. This means that you cast the spell which summons a temporary pet that runs at your target and does its thing. For DD spells, your temporary pet runs to your target and explodes. For heals, your temporary pet runs to your target and casts another heal. For buff spells, your temporary pet runs to your target and casts the buff. Get the picture? Some bombing spells include: baseline Creeping Wisp spells, baseline Verdant heals, Undergrowth (Creeping) spec Spore AE debuffs, Verdant spec bladeturn and AF buffs, and Arborial spec DD Spirit spells. This bombing method of casting spells takes a bit of getting used to, and has its ups and downs. For DD spells, you get extra casting time in while your temporary pet runs toward its target, which means that you will probably get an extra spell in before your target starts running at you. The down side is that if your target is already running at you when you cast (such as in RvR), it takes that much longer for your spell to do its damage. You also need to be very forward thinking about your heals. Since it takes several seconds to cast the heal, then a second or two for your pet to run to your target, then another second for the heal to be cast, you can see how you need to start healing much sooner than a normal healing class would. By the way, mobs will currently aggro your temporary pets. However, this aggro does not seem to transfer to you when the temporary pet goes away. Occasionally you will see a mob run at one of your temporary DD pets, but don't worry. Unless it was an AE spell, only the direct target of the spell will react and charge you. The other mob will just go back to its business. 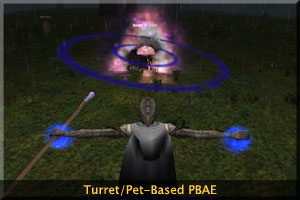
The rest of your spells (again excepting your lifetap) are all cast through your turrets and pet. The Briar spells in the Verdant Mastery spec are PBAE spells, but they work through your pet or turrets. You target a pet or turret, cast the spell, and the pet or turret almost immediately casts a PBAE spell. You get all the benefits of PBAE without having to actually stand in the center! Unfortunately, at this time, those PBAE spells seem to be underpowered and resisting quite a bit, so they aren't the end-all solution you might think they would be. The Verdant Path baseline health regen spells work on a similar PBAE concept. You cast the regen on a pet or turret, and all the friendlies (including other pets and turrets) in the area of your target benefit from the health regen. Keep in mind that this isn't like an AE chant that your turret sets up. When the health regen goes off, it only works on the friendlies around it right at that time. Even though the effect lasts for 30 seconds, friendlies that come into the area after the spell has already gone off will not get the effect. At this time the effect is very noticeable on players, but not so noticeable on your pets and turrets. If you are just healing a single turret, you might want to save your power for an extra heal bomb instead. Hunting StrategiesSoloingAnimists are great soloists, as long as you define "solo" as "standing in a field of turrets". They have buffs, debuffs, taunts, nukes, snares, and even PBAE. You can chain pull blues and greens, or tackle yellows and oranges, and maybe even a red. But the only way to do any of this and live is to plan ahead. A tank can just pull a mob and hack away at it, and you could do that as an Animist, but you wouldn't be using your skills to your full potential. For XPing, you will probably want to keep the number of turrets and pets to a minimum. They can steal up to half of the XP you would get for a mob, based on the amount of damage they do versus the amount of damage you do. Sure, you could just pop up 3 or 4 turrets in a group of greens and blues and let them do all the work, but you wouldn't level very fast. Also keep in mind that your pet and turrets count as group members in the aggro calculations. If you are trying to pull a single hard mob, you don't want to have too many turrets or you might get more than one mob at a time. 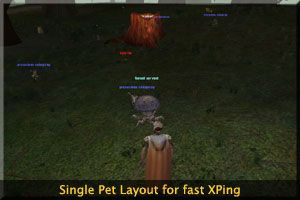
The easiest way to pull single mobs from a group is to pull with just a single controllable pet. Place the pet a bit back from the edge of the aggro range of the mobs. You can then use the pet's Attack command to pull the mob, and start casting your DDs or lifetaps immediately. You should keep your thorns (damage shield) buff on your pet at all times to help them keep aggro. The Arborial spec DDs are powerful enough that you should kill off blues in 2 or 3 casts, and yellows in 4 or 5 casts. You can pretty much chain pull blues in this way, and as long as you stick to just your controllable pet and your DDs even yellows involve minimal downtime. I've done oranges in this way, too, but that normally also involves a few pet heals. With a full mana bar and if you are careful to make sure the pet keeps the aggro, you can even solo reds in this manner. It normally isn't worth it to solo reds, though, as the XP you'll get is capped around 2 times what you should get soloing a yellow, or about what you would get soloing an orange. Since your pet will probably be doing the majority of the damage to the red, and you will be busy healing your pet, it's faster and easier to just stick with oranges when you are soloing. At level 12 you get a CON debuff bomber in your Creeping baseline. This is great for pulling mobs from a distance, as it allows you to pull the mob without doing any damage to it. This means that as soon as your pet or turrets attack the mob, the mob will aggro to them instead. You can also use your root bomb to do this, but I've found it's harder to get the pet to take the aggro when I use the root. 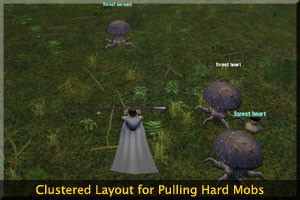
As the mobs get higher con, you will definitely want to add a few debuff or DD turrets into the mix to help you out. This isn't as straightforward as it first sounds. You do not want to put your turret right next to your pet. Remember that turrets are uncontrollable. Putting a turret that close to aggro is just asking for trouble. Instead, put the turret a behind you, but still in range of your pet. In that way, the turret's spells will still work on the mob while your pet has it, but there is a much smaller chance of it targeting something you hadn't intended. Just remember that your DD turrets have quite a large range! You may also want to test to make sure that your turrets will target the mob you want, as there seem to still be some bugs targeting high and low level mobs. DD and debuff turrets need to be used very carefully. You will almost always want to keep them as far from the mob cluster as possible. Even the buff turrets, which don't cast on mobs, will still draw aggro if they are too close to the mobs. Using any sort of offensive turret in Hy Brasil can be tricky due to the number of neutral but high-con mobs about, particularly sporites. Before you lay down your field of turrets, you may want to scout the area for possible accidental aggro. And don't forget to look up! Mobs fly in 3 dimensions now! GroupingIt may take a while for Animists to be accepted into group XPing situations. Our buff, debuff, and resist turrets only last 2 minutes, making them of limited utility. Our DD turrets are powerful, if a bit uncontrollable. But, again, they only last 2 minutes and they leech XP. However, set a DD turret in the middle of the sprag pit and you've got an automatic pulling machine that the rest of the group can latch on to. Cast a Verdant health regen on your pet after a big fight, and everyone around it gets the benefit. You can also root pull and do limited CC. You even have a damage shield which should make the tanks happy. Just be careful with your Wisp AE spells, as you don't want to draw too much aggro. A Bard or Mentalist with crack is going to be your best friend. Right now (as of 1.56b) the turrets won't attack purple pets. This is by design and they probably won't change it. And, for the most part, it is a good thing. If your turrets pulled every purple that walked by, you and your group would get dead real quick. Your controlled pet, however, should attack anything you tell it to, regardless of con. In situations where you are in a group pulling purples, just skip the DD and debuff/snare turrets. They won't help you. You'll want to just pop up a few buff turrets in that case. Some people have had luck with their offensive turrets attacking purple mobs if the mob has aggroed onto them, but I've tested this and can't get it to work. And, honestly, do you really want a purple mob to attack you just your your turrets will attack it? In a group situation, you probably won't be the one holding the aggro, anyway. Where to HuntHunting and leveling as an Animist in Hy Brasil is easy. Just go outside Domnan and follow the road. As you gain levels you will move further down the road. You won't need to stray too much from the path as you level, except for the occasional kill task and sweet camp spot. With the layout of Domnan and the plethora of named guards available, there is no reason to not use kill tasks as much as possible. You can go from 1 to 10 in a matter of just a few hours by using kill tasks. You can use the ones by Domnan until 4 or 5, the ones at the first guard hut until 8 or 9, and the second guard hut until 12 or 13. Their tasks will get you the first 7 or 8 bubbles of each level in no time, so use them! The guards rotate every 4 levels, and there are only 3 named guards at each hut, so you will eventually come to a level where you have to go back a set of guards to get your kill tasks. 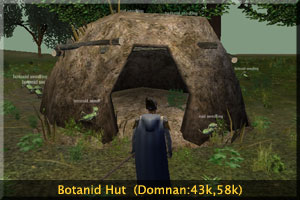
As for nice camp spots, there are several. The first one you should find is a sylvanshade tree. These are just outside of Domnan to the NE and NW, so you really can't miss them. You can chain pull sylvanshades with your lifetap, they pop quickly, and they even occasionally drop cloth armor that you can use. At 4 or 5 head on over to the botanid hut at loc (43k,58k). It's SE out of Domnan and somewhat close to the water. You can chain pull here until level 7ish. Bantam Shrouder trees (36k,38k) will get you through until 9ish, when you need to head over to the cniogcrags. They normally cluster near fallen trees or tree stumps. The two main ones are right behind and in front of the second guard hut. There is another botanid camp at the big logs at the crossroads just N of the second guard camp. The mobs there will con yellow to red for a level 10. These should last you until 13 at least. From there you can head E to Star Lake and pull Anglators. Careful, they BAF! At that point you can start heading into the dungeons and normal camping grounds. Muire Tomb should get you to 16 or 17 easy. I was chain-pulling the spiders at the entrance when they were yellow by setting up a line of turrets down the hallway and letting them do all the work. It wasn't the fastest XP, but it was pretty safe. After that you move to Parthanons, the Spraggon Den, etc etc etc. RvRRvR as an Animist is going to be hot and cold. Since our primary weapons, turrets and pets, are stationary and require quite a bit of setup time and thought, we're not going to be very good at sudden encounters. We have a root bomber, which should prove quite useful. Our debuffs and AE spells should also be great. But, it will be very different than PvE where we can take time to set up our turrets. However, if there is one thing we will excel at it will be keep and milegate defense. Since our pets are ground-targeted, we can just sit safely inside the keep and summon pets on the other side of the doors whenever we want. Even better, we can then use our PBAE spells on those turrets to then have them do extra damage to the tanks that try to kill them. A few Animists with some crack could set up a minefield of turrets that would make for a slaughter. Appendix A: Animist Spell TablesThese tables come directly from the XML feed at the Herald. I do not maintain them manually, so if the Herald is screwed up, then these probably will be as well. I've modified the display a bit from how the Herald does it, as the Herald's version makes it difficult to tell what role the pets and turrets play in each spell. Here is a sort of key for reading these tables:
I also have page with just these spells on it. Appendix B: Other Resources
Appendix Z: Version InformationThe latest version of this guide should always be at [ http://www.rixsoft.com/RestlessSouls/Animist/ ]. If you have any corrections to this guide, or would like to suggest improvements, you can email me at:
|